


🥫 Homemade SPAM
Canning vs. Baking – Two Ways, One Delicious Recipe
📌 In This Article
🥫 The SPAM Story
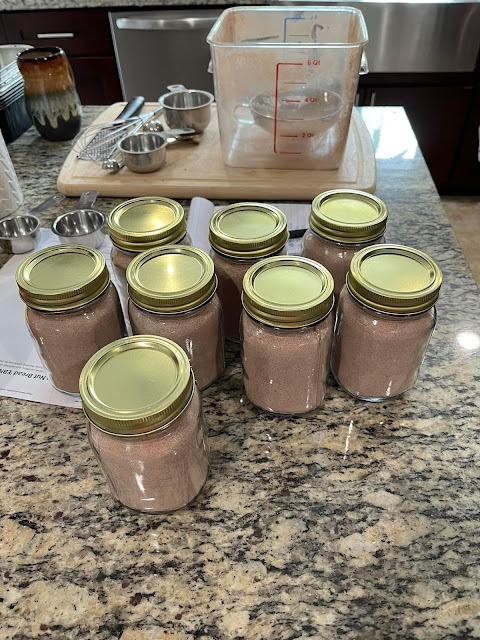
"I have been making homemade SPAM for years using the same recipe and technique (baking loaves in a water bath). I thought I would try canning a batch to see the results." 🥫✨
SPAM — that iconic canned meat that's been a pantry staple for generations. Love it or hate it, there's no denying its convenience and versatility. But what if you could make your own homemade version that tastes even better than the original?
For years, I've been making homemade SPAM using a simple recipe and technique — baking the loaves in a water bath. The results are consistently delicious: tender, flavorful, and perfect for sandwiches, breakfast, or just about anything. But I always wondered: could I can it for shelf-stable storage like the original?
So I decided to try it. I made a batch using my trusted recipe, split it in half, and processed one half as baked loaves (my usual method) and the other half in a pressure canner. The goal was to compare the results — flavor, texture, convenience, and shelf life.
The results were surprising, delicious, and informative. Here's everything you need to know about making homemade SPAM both ways.
💬 What is SPAM? "SPAM is a seasoned luncheon meat made from pork shoulder and ham. It was invented in 1937 and became a global phenomenon. This homemade version uses the same basic ingredients but without preservatives or artificial flavors."
📦 Ingredients — One Recipe, Two Methods
This recipe makes enough for either 2 baked loaves or 4–5 pint jars of canned SPAM. You can also halve it for a smaller batch.
Base Ingredients
- 🥩 3 lbs pork shoulder – boneless, cut into chunks
- 🥩 1 lb ham – smoked or cured, diced
- 🧂 2 tablespoons kosher salt
- 🧂 1 tablespoon sugar
- 🧂 1 teaspoon curing salt (Prague Powder #1) – optional, for traditional pink color and preservation
- 🧂 1 teaspoon black pepper
- 🧂 1 teaspoon garlic powder
- 🧂 ½ teaspoon ground coriander
- 🧊 ½ cup ice water – to keep the meat cold during grinding
- 🫒 1 tablespoon liquid smoke (optional) – for that classic smoky flavor
For the Baked Version (Water Bath)
- 🍞 2 loaf pans – 8.5" x 4.5" or similar
- 🫗 Aluminum foil – for covering the loaves
- 🫗 Large roasting pan – for the water bath
For the Canned Version
- 🥫 4–5 pint jars – with new lids and bands
- 🔒 Pressure canner – for safe processing
💡 Pro tip: "Curing salt (Prague Powder #1) is optional but recommended if you want the traditional pink color of SPAM. It also acts as a preservative. If you skip it, the meat will be grayish-brown but still taste delicious."
🔥 Baked Method – Water Bath Technique
This is the method I've used for years — baking the SPAM loaves in a water bath for tender, moist results.
Step-by-Step Instructions
Step 1 — Prepare the Meat
- Cut the pork shoulder and ham into 1-inch chunks.
- Place the meat in a large bowl and add the salt, sugar, curing salt (if using), black pepper, garlic powder, and coriander.
- Mix well to coat all the meat evenly with the seasonings.
- Cover and refrigerate for at least 2 hours or overnight to allow the flavors to develop.
Step 2 — Grind the Meat
- Set up your meat grinder with a medium grinding plate (¼ inch or so).
- Grind the chilled meat mixture into a large bowl. Keeping the meat cold is essential for a fine texture.
- If the meat starts to get warm, place it in the freezer for 15 minutes before continuing.
Step 3 — Mix and Emulsify
- Add the ice water and liquid smoke (if using) to the ground meat.
- Using a stand mixer with the paddle attachment or a sturdy spoon, mix the meat for 3–5 minutes until it becomes sticky and emulsified.
- This step is crucial for the classic SPAM texture — the mixture should be smooth and pasty, not crumbly.
💡 Pro tip: "The emulsification step is what gives SPAM its signature texture. Don't skip it! The mixture should come together into a cohesive, sticky paste."
Step 4a — Pack the Loaf Pans
- Line your loaf pans with parchment paper for easy removal.
- Pack the meat mixture firmly into the loaf pans, pressing down to remove any air pockets.
- Smooth the top with a spatula or the back of a spoon.
Step 5a — Prepare the Water Bath
- Preheat your oven to 325°F (165°C).
- Place the loaf pans in a large roasting pan.
- Carefully pour hot water into the roasting pan until it reaches about halfway up the sides of the loaf pans.
- Cover the loaf pans with aluminum foil to prevent the tops from drying out.
Step 6a — Bake
- Bake for 1½ to 2 hours, or until the internal temperature of the SPAM reaches 160°F (71°C).
- Check the temperature with a meat thermometer inserted into the center of the loaf.
- The water bath ensures gentle, even cooking and prevents the edges from getting too dry.
Step 7a — Cool and Slice
- Remove the loaf pans from the water bath and let them cool on a wire rack for 15 minutes.
- Remove the SPAM from the pans and let them cool completely to room temperature.
- Wrap tightly in plastic wrap or aluminum foil and refrigerate for at least 4 hours before slicing.
- Slice and enjoy within 5–7 days, or freeze for longer storage.
⚠️ Important: "Refrigerate the baked SPAM before slicing — it firms up as it cools and slices much more cleanly. Cold SPAM is much easier to slice thinly."
🥫 Pressure Canned Method
This is the experimental method — pressure canning the SPAM for shelf-stable storage.
Step-by-Step Instructions
Step 1 — Prepare the Meat
- Follow the same Step 1 through Step 3 from the baked method above.
- Cut, season, grind, and emulsify the meat mixture exactly the same way.
Step 2b — Prepare the Jars
- Wash 4–5 pint jars, lids, and bands in hot, soapy water. Keep them hot in your dishwasher or in a pot of simmering water.
- Prepare your pressure canner according to the manufacturer's instructions, adding 2–3 inches of water.
Step 3b — Pack the Jars
- Pack the emulsified meat mixture firmly into the hot pint jars, pressing down to remove air pockets.
- Leave 1 inch of headspace at the top of each jar.
- Run a non-metallic spatula around the inside of each jar to release any trapped air bubbles.
💡 Pro tip: "Pack the meat firmly but don't overfill. The 1-inch headspace is essential for safe pressure canning — it allows the meat to expand during processing."
Step 4b — Wipe and Seal
- Wipe the jar rims with a clean, damp cloth to ensure a perfect seal.
- Center the lids on the jars and screw on the bands until they are "fingertip tight" — just snug, not forced.
Step 5b — Pressure Can
- Place the filled jars onto the rack in your pressure canner.
- Lock the lid and turn the heat to high. Let steam vent from the petcock for a full 10 minutes before adding the weight.
- Bring the canner to 10 psi (for 0–1,000 ft altitude).
- Once the correct pressure is reached, start your timer. Process pint jars for 75 minutes, maintaining constant pressure.
- When processing time is complete, turn off the heat and let the canner depressurize naturally. This can take 30–45 minutes — do not rush it.
- Once the pressure gauge reads zero, wait a few more minutes, then carefully remove the lid, tilting it away from your face.
Step 6b — Cool and Store
- Let the jars sit in the canner for 10 more minutes before removing them to a towel-lined counter.
- Cool for 12–24 hours, then check seals. Lids should be concave and not flex when pressed.
- Store in a cool, dark pantry for 12–18 months.
⚠️ Safety reminder: "This recipe contains meat — it MUST be pressure canned. Water bath canning is NOT safe for pork products. Always follow tested pressure canning guidelines for low-acid foods."
📝 Observations & Results
🔍 What I Learned from Canning SPAM
After years of making baked SPAM, I was curious to see how the canned version would compare. Here are my observations:
🟢 Texture Comparison
- 🔥 Baked: Tender, moist, and slightly firm. The water bath creates a gentle, even cook that keeps the meat tender throughout.
- 🥫 Canned: Surprisingly similar! The pressure canning process cooks the meat thoroughly and the texture remains firm and sliceable. It's slightly more dense than the baked version but still excellent.
🟢 Flavor Comparison
- 🔥 Baked: Rich, savory, with a slight caramelization on the edges from baking. The flavors are well-developed and balanced.
- 🥫 Canned: The flavors meld together beautifully during pressure canning. The meat picks up a subtle, almost "aged" quality that is quite pleasant. The liquid smoke flavor is more pronounced in the canned version.
🟢 Convenience Comparison
- 🔥 Baked: Ready in about 2 hours. Must be refrigerated and consumed within 5–7 days. Can be frozen for longer storage.
- 🥫 Canned: Takes about 2.5 hours total (including pressure canning). Once canned, it's shelf-stable for 12–18 months — the ultimate convenience!
🟢 Overall Verdict
- 🔥 Baked: Perfect for immediate consumption or if you prefer a slightly softer texture. Great for sandwiches, breakfast, and snacks.
- 🥫 Canned: An excellent option for long-term storage. The texture is slightly firmer but still delicious. It's ideal for emergency food supplies, camping, or simply having homemade SPAM always on hand.
💡 My conclusion: "Both methods work wonderfully. If you have the time and a pressure canner, canning is a fantastic way to preserve homemade SPAM for months. The baked version is quicker and yields a slightly softer texture. You really can't go wrong with either!"
💡 Pro Tips for Perfect Homemade SPAM
Meat Selection
- 🥩 Use a mix: The combination of pork shoulder and ham gives the perfect balance of fat, flavor, and texture. Pork shoulder provides richness while ham adds a smoky, salty depth.
- 🥩 Keep it cold: Cold meat grinds better and emulsifies more easily. If the meat gets warm, pop it in the freezer for 15 minutes.
Emulsification
- 🥄 Mix well: The emulsification step is the key to SPAM's signature texture. Mix until the meat is sticky, pasty, and holds together when pressed.
- 🥄 Use a stand mixer: A stand mixer with a paddle attachment makes this step effortless. Mix on medium speed for 3–5 minutes.
Baking Tips
- 🔥 Line with parchment: This makes removing the SPAM from the loaf pans much easier.
- 🔥 Don't skip the water bath: The water bath ensures gentle, even cooking and prevents the edges from drying out.
- 🔥 Cool before slicing: Let the SPAM cool completely in the refrigerator before slicing for clean, even slices.
Canning Tips
- 🥫 Pack firmly: Press the meat into the jars to remove air pockets. This prevents the meat from being too porous after canning.
- 🥫 Check your altitude: Adjust the pressure according to your elevation. Use 10 psi for 0–1,000 ft, 11 psi for 1,001–2,000 ft, and so on.
- 🥫 Don't rush the cool-down: Let the pressure drop naturally for the best results and safety.
💡 Pro tip: "Homemade SPAM makes an incredible gift! Can a few jars and give them to friends and family — they'll be amazed that you made it yourself."
❓ Frequently Asked Questions
❓ Can I use this recipe for other meats?
Yes — you can substitute beef, turkey, or chicken for the pork. The texture and flavor will vary, but the technique works the same.
❓ Why do I need curing salt?
Curing salt (Prague Powder #1) gives SPAM its traditional pink color and acts as a preservative. It's optional but recommended if you want the classic look.
❓ Can I skip the curing salt?
Yes — the SPAM will still taste delicious, but it will be grayish-brown in color instead of pink. It's safe to eat as long as it's properly cooked.
❓ How long does baked SPAM last?
Baked SPAM lasts 5–7 days in the refrigerator. You can also freeze it for up to 3 months.
❓ How long does canned SPAM last?
Properly pressure-canned SPAM lasts 12–18 months in a cool, dark pantry. Once opened, refrigerate and use within 3–4 days.
❓ Can I water bath can this?
No — this recipe contains pork and must be pressure canned for safety. Water bath canning is not safe for meat.
❓ Can I use a food processor instead of a meat grinder?
Yes — you can use a food processor, but work in small batches and be careful not to over-process. The texture will be slightly different but still good.
❓ How do I serve homemade SPAM?
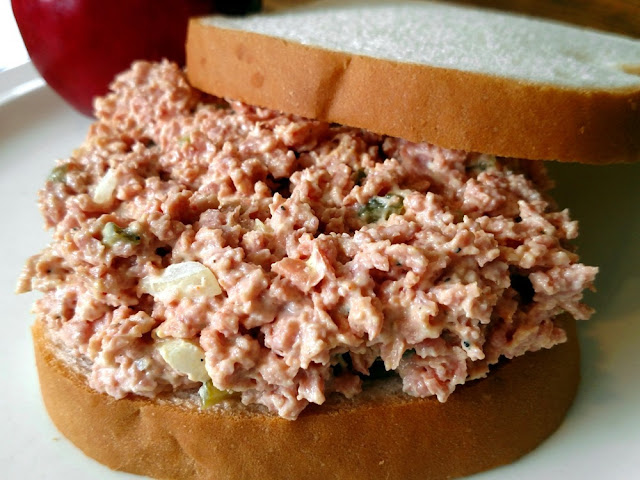
Slice it and fry it for breakfast, dice it for fried rice, slice it for sandwiches, or cube it for soups and casseroles. It's incredibly versatile!
❓ Can I add other seasonings?
Absolutely — try adding chili flakes for heat, smoked paprika for extra smokiness, or herbs like thyme or rosemary for variety.
❓ Why is my SPAM crumbly?
Crumbly SPAM is usually caused by insufficient emulsification. Make sure you mix the meat long enough until it becomes sticky and cohesive.
❓ Can I can the baked SPAM after it's cooked?
No — you cannot can already cooked meat safely. If you want canned SPAM, follow the canning method from the start.
❓ Is homemade SPAM healthier than store-bought?
Yes — you control the ingredients, so you can reduce sodium, skip preservatives, and avoid artificial additives. It's a much cleaner version.
📄 Printable Recipe Card — Both Methods
╔═══════════════════════════════════════════════════════════════════════╗
║                    HOMEMADE SPAM — TWO WAYS                         ║
║          Baked (Water Bath) · Pressure Canned (Shelf-Stable)        ║
╚═══════════════════════════════════════════════════════════════════════╝

YIELD: 2 baked loaves OR 4–5 pint jars | PREP TIME: 45 min

INGREDIENTS:
- 3 lbs pork shoulder, cut into chunks
- 1 lb ham, diced
- 2 tbsp kosher salt
- 1 tbsp sugar
- 1 tsp curing salt (Prague Powder #1) — optional
- 1 tsp black pepper
- 1 tsp garlic powder
- ½ tsp ground coriander
- ½ cup ice water
- 1 tbsp liquid smoke (optional)

═══════════════════════════════════════════════════════════════════════
🔥 BAKED METHOD (WATER BATH)
═══════════════════════════════════════════════════════════════════════
1. Season meat, chill 2+ hours.
2. Grind with medium plate.
3. Add ice water and liquid smoke. Mix until sticky (3–5 min).
4a. Pack into parchment-lined loaf pans.
5a. Place in roasting pan with hot water halfway up sides.
6a. Cover with foil. Bake at 325°F for 1.5–2 hrs (160°F internal).
7a. Cool, refrigerate 4+ hours, then slice.

STORAGE: 5–7 days refrigerated · 3 months frozen

═══════════════════════════════════════════════════════════════════════
🥫 PRESSURE CANNED METHOD
═══════════════════════════════════════════════════════════════════════
1. Follow steps 1–3 from baked method.
2b. Pack into hot pint jars, leaving 1" headspace.
3b. Wipe rims, apply lids (fingertip tight).
4b. Pressure can at 10 psi for 75 minutes (adjust for altitude).
5b. Let pressure drop naturally. Remove jars, cool 12–24 hours.
6b. Check seals. Store in cool, dark place.

STORAGE: 12–18 months shelf-stable

═══════════════════════════════════════════════════════════════════════
OBSERVATIONS:
- Baked: Tender, moist, slightly softer texture.
- Canned: Dense, firm, excellent for long-term storage.
- Both: Delicious and better than store-bought!

"I have been making homemade SPAM for years — canning it was a game-changer!" 🥫✨
© HomemadeSPAM — Homemade SPAM | Canning vs. Baking Complete Guide











Comments