
Epic Canning Adventure: Processing 84 Half Pint Jam Jars in One Go

In the world of canning, efficiency is key.
Imagine the satisfaction of preserving 84 half pint jam jars in a single batch! In this article, we'll explore the process of processing a large quantity of jars using a canner's maximum capacity. Whether you're a seasoned canner or just starting out, this guide will provide you with the knowledge and confidence to tackle big canning projects. Get ready to embark on a journey of preserving perfection as we dive into the intricacies of processing 84 half pint jam jars in one go.
Recipe: Half Pint Jam Jars (Any Fruit Jam)
Ingredients:
- - Fresh fruit of your choice (e.g., strawberries, raspberries, peaches)
- - Granulated sugar
- - Lemon juice (optional)
- - Pectin (if needed, check the fruit-specific instructions on the package)
- - Half pint canning jars with lids and bands
Instructions:
1. Prepare the fruit:
- - Wash the fruit thoroughly and remove any stems, pits, or seeds. For larger fruits, such as peaches, peel and chop them into small pieces. Crush or mash the fruit to your desired consistency.
2. Cook the fruit:
- - In a large, non-reactive pot, combine the prepared fruit, sugar (follow the recipe guidelines for the fruit-to-sugar ratio), and lemon juice (if using). Stir well to blend the ingredients.
3. Bring to a boil:
- - Place the pot over medium-high heat and bring the fruit mixture to a boil. Stir frequently to prevent sticking and scorching. Skim off any foam that forms on the surface.
4. Add pectin (if needed):
- - If your chosen fruit requires pectin for proper thickening, follow the instructions on the package. Add the pectin to the boiling fruit mixture and continue stirring for the recommended cooking time.
5. Test the jam for doneness:
- - To check if the jam has reached the desired consistency, perform a spoon test. Place a small amount of jam on a chilled spoon and let it cool for a few seconds. If it wrinkles slightly when pushed with your finger, it is ready.
6. Prepare the jars and lids:
- - Wash the half pint canning jars, lids, and bands in hot, soapy water. Rinse them thoroughly and inspect for any cracks or defects. Sterilize the jars by using a boiling water bath method or following the manufacturer's instructions.
7. Fill the jars:
- - Using a ladle or a canning funnel, carefully fill each sterilized half pint jar with the hot jam, leaving 1/4 inch of headspace. Wipe the jar rims clean with a damp cloth to ensure a proper seal.
8. Apply the lids and bands:
- - Place the lids on the filled jars and tighten the bands until they are finger-tight. Avoid overtightening, as it can interfere with the sealing process.
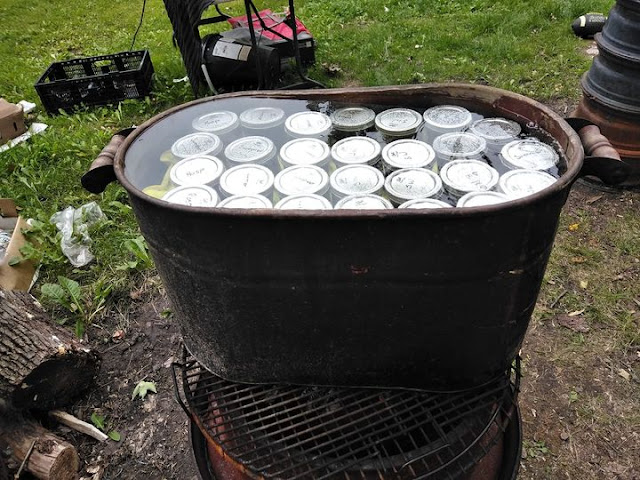
9. Process the jars:
- - Using a canner that can accommodate the maximum number of jars (in this case, 84 half pint jars), place the jars in the canner rack. Lower the rack into the canner, ensuring that the jars are fully submerged in water. Follow the recommended processing time for the type of jam you are canning and adjust it according to your altitude.
10. Remove and cool the jars:
- - Once the processing time is complete, carefully lift the canner rack out of the water and place it on a heat-resistant surface. Allow the jars to cool undisturbed for12 to 24 hours. You may hear a satisfying "pop" sound as the lids seal.
11. Check the seals and store:
- - After the cooling period, check the jars for proper seals by pressing down on the center of each lid. If the lid doesn't flex and feels firm, the jar is sealed. Label the jars with the date and store them in a cool, dark place for future enjoyment.
Processing a large quantity of half pint jam jars in one go is a remarkable feat that showcases your canning prowess. By following the steps outlined in this guide, you can confidently tackle big canning projects and enjoy the fruits of your labor for months to come. Whether you're preserving homemade jam or any other delectable creation, the satisfaction of seeing rows of perfectly sealed jars is unmatched. Embrace the art of large-scale canning and revel in the joy of preserving perfection.


Comments