
Homemade & Canned SpaghettiOs for the Grandkids (With My Canned Ratatouille Spaghetti Sauce!)

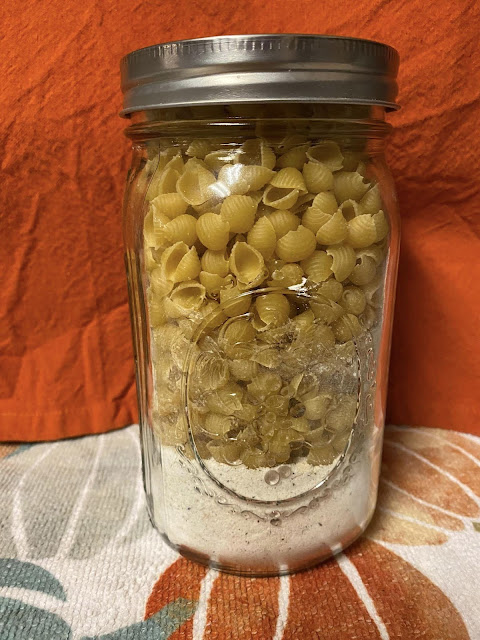
Made and canned some SpaghettiOs for the grandkids. At least I know what's in it. Not a bunch of preservatives, that's for sure. I used my Ratatouille Spaghetti sauce that I canned prior to.
There is something so deeply satisfying about making a childhood favorite from scratch. When the grandkids come over and ask for SpaghettiOs, I love knowing that the jar I'm opening is full of real tomatoes, vegetables, and love — not a list of ingredients I can't pronounce.
I used my home-canned Ratatouille Spaghetti sauce as the base for this, which gave it an incredible, rich, garden-fresh flavor. Here is the full guide to making and canning your own homemade SpaghettiOs.
Why You'll Love This Recipe
It’s a childhood favorite made healthy. All the fun of store-bought, without the preservatives.
It’s a great use for your canned sauce. If you have home-canned marinara or ratatouille sauce, this is a perfect way to use it.
The grandkids love it. The fun little pasta rings make it a hit with kids.
It’s shelf-stable. Properly pressure canned, these jars are ready for busy days.
It saves money. A batch makes several jars for a fraction of the store-bought price.
It gives you peace of mind. You know exactly what is in every single jar.
Ingredients You'll Need
Makes about 6 to 7 pint jars
For the Pasta:
1 pound dry Anellini pasta (small pasta rings), or small alphabet pasta
Water for boiling
For the Sauce:
6 cups home-canned Ratatouille Spaghetti sauce (or your favorite marinara)
2 cups water or chicken/vegetable broth (to thin the sauce)
1 teaspoon salt (adjust to taste, depending on how salty your canned sauce is)
1/2 teaspoon black pepper
1/2 teaspoon garlic powder (optional)
1/2 teaspoon dried oregano (optional)
For the Jars:
Pint jars, washed and kept hot
New lids and rings
Pressure canner
Why These Ingredients Matter
Anellini pasta (or alphabet pasta) gives it that classic SpaghettiOs shape. Small pasta shapes work best for canning because they pack well and don't clump together.
Home-canned Ratatouille Spaghetti sauce is the star here. It brings a rich, complex, vegetable-packed flavor that store-bought sauce can't match.
Broth or water thins the sauce out so it coats the pasta perfectly without being too dense for canning.
Garlic and oregano add a little extra Italian flavor if your sauce needs a boost.
A Very Important Note on Canning Pasta
Pasta is a low-acid food, and when combined with sauce, it creates a dense mixture. You must pressure can this recipe. Water bath canning is not safe for pasta and meat sauces.
Additionally, because pasta absorbs liquid and expands, you must slightly undercook the pasta and use a slightly thinner sauce than you normally would. If the jars are packed too densely, the heat cannot penetrate to the center safely. Always follow tested pressure canning guidelines for your altitude.
Equipment Needed
Pressure canner (required for safety)
Pint jars, washed and kept hot
New lids and rings
Jar lifter
Canning funnel
Bubble remover or thin spatula
Clean dish towels
Large pot (for boiling pasta)
Large pot (for heating the sauce)
Wooden spoon or spatula
Ladle
Step-by-Step Instructions
Step 1: Cook the Pasta
Bring a large pot of water to a boil. Add the Anellini pasta and cook it for 2 minutes less than the package directions. You want it slightly underdone (al dente) so it finishes cooking in the canner and doesn't turn to mush. Drain and rinse briefly with cool water to stop the cooking process.
Step 2: Heat the Sauce
In a large pot, combine your home-canned Ratatouille Spaghetti sauce, water or broth, salt, pepper, garlic powder, and oregano. Bring to a gentle simmer. The sauce should be slightly thinner than normal, as the pasta will absorb the liquid while processing.
Step 3: Combine Pasta and Sauce
Gently fold the drained pasta into the simmering sauce. Stir well to ensure every ring is coated.
Step 4: Prep the Jars and Canner
Wash the jars, lids, and rings in hot soapy water and keep the jars hot. Fill the pressure canner with 2 to 3 inches of water and begin heating it.
Step 5: Fill the Jars
Ladle the hot pasta and sauce mixture into hot jars, leaving 1 inch of headspace. It's important not to pack the pasta down too tightly! Leave the sauce slightly loose to allow heat to circulate.
Step 6: Remove Bubbles
Use a bubble remover or thin spatula to gently remove air bubbles. Add more sauce if the liquid level drops. Wipe the rims clean with a damp cloth. Apply the lids and rings until fingertip-tight.
Step 7: Pressure Can
Place the jars in your pressure canner according to the manufacturer's instructions. Process pints for 75 minutes at 10 pounds of pressure (adjust for altitude). Always verify processing times with your local extension service or the National Center for Home Food Preservation.
Step 8: Cool and Check Seals
Let the canner depressurize naturally. Remove the jars and cool for 24 hours. Check the seals — the lids should be concave and not flex. Label and store in a cool, dark place.
Step 9: Reheat and Serve
To serve, pour the contents of a jar into a saucepan and heat gently until bubbly. Serve with a sprinkle of Parmesan cheese!
Expert Tips
Undercook the pasta. This is the most important step. If it's fully cooked before canning, it will turn to mush.
Don't pack the jars tightly. Pasta expands. Leave it loose so the heat can safely penetrate the jar.
Keep the sauce slightly thin. The pasta will drink up the liquid over time.
Check every seal. Any jars that didn't seal should be refrigerated and eaten within 3 to 4 days.
Let the kids help. If the grandkids are visiting, let them stir the pasta into the sauce (away from the heat) for a fun kitchen activity.
Recipe Variations
Meat Sauce SpaghettiOs: Add cooked ground beef or Italian sausage to the sauce before filling the jars.
Cheesy SpaghettiOs: You cannot add dairy to the jar before canning. However, you can stir in a handful of shredded cheddar or Parmesan when you reheat it on the stove.
Alphabet Soup: Use alphabet pasta instead of rings for a fun twist.
Spicy SpaghettiOs: Add a pinch of red pepper flakes to the sauce.
Storage and Freezing
Canned: Store sealed jars in a cool, dark place for up to 12 months. Check the seals before using.
Refrigerator: Any jars that didn't seal should be refrigerated and used within 3 to 4 days.
Freezer: If you prefer not to pressure can, you can freeze the cooled mixture in freezer-safe containers for up to 3 months. Thaw overnight in the refrigerator before reheating.
Frequently Asked Questions
Can I water bath can this recipe?
No. Pasta is a low-acid food and must be pressure canned to be safe.
Why did my pasta turn mushy?
It was likely overcooked before canning. Always cook pasta 2 minutes less than the package directions when you plan to can it.
Can I add cheese to the jars?
No. Dairy cannot be safely canned. Add cheese when you reheat the SpaghettiOs.
What kind of pasta is best?
Anellini (small rings) or alphabet pasta. You can also use small macaroni, but rings are the classic choice.
How do I know if my jars sealed?
Press down on the center of the lid. If it doesn't flex or pop back, it's sealed. You should also hear a "ping" shortly after removing them from the canner.
Is this safe for kids?
Yes, absolutely. Just make sure to heat it thoroughly before serving.
Printable Recipe Card
HOMEMADE & CANNED SPAGHETTIOS
Yield: About 6-7 pint jars | Prep Time: 15 minutes | Cook Time: 15 minutes | Process Time: 75 minutes (pints) | Total Time: About 1 hour 45 minutes
Ingredients:
1 pound dry Anellini pasta (small rings)
6 cups home-canned Ratatouille Spaghetti sauce
2 cups water or broth
1 teaspoon salt (adjust to taste)
1/2 teaspoon black pepper
1/2 teaspoon garlic powder (optional)
1/2 teaspoon dried oregano (optional)
Instructions:
Boil pasta in water for 2 minutes less than package directions. Drain and rinse.
In a large pot, heat the canned sauce, water/broth, salt, pepper, and seasonings to a simmer.
Gently fold the pasta into the sauce.
Prep jars, lids, and rings. Fill the pressure canner with 2-3 inches of water and begin heating.
Ladle the mixture into hot jars, leaving 1 inch of headspace. Do not pack tightly! Remove air bubbles. Wipe rims. Apply lids and rings fingertip-tight.
Pressure can pints for 75 minutes at 10 pounds of pressure (adjust for altitude).
Let the canner depressurize naturally. Remove jars and cool for 24 hours. Check seals, label, and store.
To serve, heat the contents of a jar in a saucepan until bubbly. Top with Parmesan cheese.
Notes: Always undercook the pasta so it doesn't turn to mush. Do not add cheese or dairy to the jars before canning. Always verify pressure canning times with your local extension service or the National Center for Home Food Preservation.
From the maker: "At least I know what's in it. Not a bunch of preservatives, that's for sure."
Disclaimer: This article is for informational and educational purposes only. Always follow safe canning practices from the USDA, the National Center for Home Food Preservation, or your local extension service. Use tested recipes and proper canning procedures to ensure food safety. Low-acid foods like pasta must be pressure canned.









Comments