
Easy and Safe Bean Canning Method: Preserving Beans the Old-Fashioned Way Without a Pressure Canner"

Ingredients:
- Fresh green beans
- Spring water
Equipment:
- Mason jars with lids and bands
- Boiling water canner or large pot
- Jar lifter
- Seals for canning jars
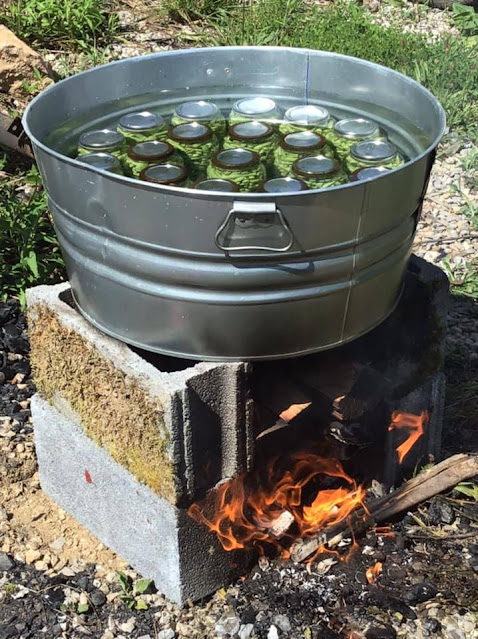
- Washtub or stovetop canner (not a pressure canner)
Instructions:
1. Prepare the green beans by washing them thoroughly and removing any stems or blemishes. Trim the beans to your desired length.
2. Sterilize the mason jars, lids, and bands by washing them with hot soapy water and rinsing well. You can also place them in a hot water bath or run them through a dishwasher cycle.
3. Pack the prepared green beans tightly into the sterilized jars, leaving approximately 1 inch (2.54 cm) of headspace at the top of each jar.
4. Fill the jars with spring water, ensuring that the beans are completely submerged. Leave approximately 1 inch (2.54 cm) of headspace to allow for expansion during the canning process.
5. Place the seals for canning jars in boiling water for a few minutes to soften them.
6. Meanwhile, fill a washtub or stovetop canner with enough water to cover the jar lids by at least 1 inch (2.54 cm). Bring the water to a boil.
7. Once the water has reached a rolling boil, carefully lower the jars into the boiling water using a jar lifter. Ensure that the jars are fully submerged and that the water covers the lids by at least 1 inch (2.54 cm).
8. Set a timer for 4 hours and maintain a gentle boil throughout the process. This method of canning without a pressure canner relies on a longer processing time to ensure food safety.
9. After the timer has elapsed, turn off the heat and allow the jars to cool down in the water for a sufficient amount of time to handle them safely.
10. Carefully remove the jars from the water bath using a jar lifter and place them on a clean kitchen towel or cooling rack. As the jars cool, you will hear a popping sound, indicating that the lids are sealing. This process may take several hours.
11. Once the jars have cooled completely, check the seals by pressing on the center of the lids. If the lids do not flex or pop back, the jars are properly sealed. Any unsealed jars should be refrigerated and consumed within a few days.
12. Label the sealed jars with the date and store them in a cool, dark place. Canned beans prepared using this method can last for up to 1 year or more.
Note:
While this method is suitable for canning beans without a pressure canner, it's important to note that pressure canning is the recommended method for ensuring optimal food safety. Always follow proper canning procedures and guidelines provided by reliable sources and the USDA for safe canning practices.


Comments
This is an unsafe canning method that may cause botulism
ReplyDeleteSo..How did the people of old servive ? Did they all die when they canned their food ? Give me the % of people that got botulism. Have a great day..
ReplyDeleteOne's enough for me.
DeleteI know right. This is the way my mother did her canning except she would tighten the lids and turn the jars upside down
Delete