
Preserving Perfection: Mastering the Art of Homemade Canned Butter.

Butter, with its rich and creamy texture, is a staple in many kitchens.
While store-bought butter is convenient, there's something special about crafting your own homemade version and preserving it for long-term storage. Canned butter offers a convenient and shelf-stable option that can be enjoyed in various recipes or spread on warm bread. In this article, we'll explore the process of making and canning homemade butter, sharing step-by-step instructions, tips, and a delectable recipe. Get ready to embark on a journey of preserving creamy goodness as we delve into the world of homemade canned butter.
Preserving Creamy Goodness: A Guide to Making and Canning Homemade Butter
Butter, with its velvety texture and irresistible flavor, is a kitchen staple that enhances dishes and delights taste buds. While store-bought butter is readily available, creating your own homemade version allows you to take control of the ingredients and achieve a personalized taste. Canning homemade butter takes the preservation process a step further, providing a convenient and long-lasting option for enjoying butter beyond its regular shelf life. In this article, we'll guide you through the process of making and canning homemade butter, sharing valuable tips, techniques, and a mouthwatering recipe that will have you savoring the creamy goodness of preserved butter.
Recipe: Homemade Canned Butter
Ingredients:
- - 4 cups heavy cream (preferably pasteurized, not ultra-pasteurized)
- - 1/4 teaspoon salt (optional, for salted butter)
Equipment:
- Stand mixer or hand mixer
- Canning jars with lids and bands
- Large stockpot or canner for water bath processing
- Jar lifter or tongs for handling hot jars
Instructions:
1. Prepare the Canning Jars:
- Wash the canning jars, lids, and bands in hot, soapy water and rinse thoroughly.
- Place the jars in a large stockpot or canner, fill it with water, and bring it to a simmer. Keep the jars hot while preparing the butter.
2. Whip the Cream:
- Pour the heavy cream into a stand mixer bowl or a large mixing bowl if using a hand mixer.
- If desired, add salt for salted butter.
- Using the whisk attachment or beaters, whip the cream on medium-high speed until it thickens and the fat separates from the liquid. This process typically takes around 10-15 minutes, but times may vary.
3. Continue Mixing:
- Reduce the mixer speed to low and continue beating the butter until it forms solid clumps and the liquid (buttermilk) separates completely.
4. Drain and Rinse the Butter:
- Place a fine-mesh strainer or cheesecloth-lined colander over a large bowl or sink.
- Pour the butter and buttermilk mixture into the strainer, allowing the liquid to drain away.
- Gently press the butter solids with a clean spoon or spatula to remove any excess liquid.
- Rinse the butter under cold water to remove any remaining buttermilk, which can cause spoilage during storage.
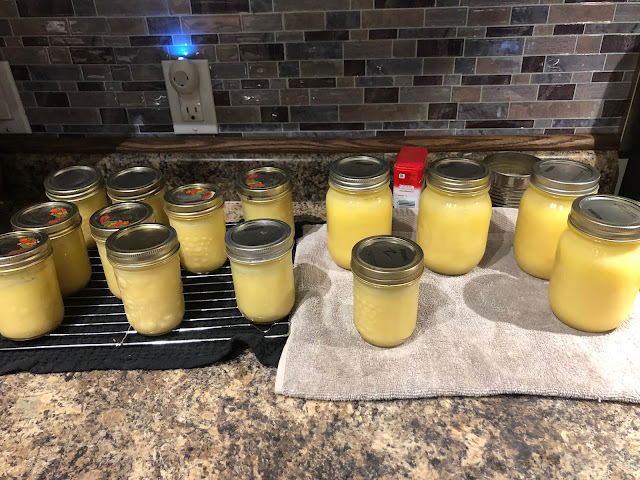
5. Pack the Canning Jars:
- Remove the hot jars from the simmering water bath, pouring out the water.
- Using a spoon or butter dish, pack the freshly made butter into the hot jars, leaving about 1/2 inch of headspace at the top.
- Wipe the jar rims with a clean, damp cloth to ensure a clean seal.
- Place the lids and bands on the jars, tightening them securely but not overly tight.
6. Process in a Water Bath:
- Return the filled jars to the stockpot or canner, making sure they are covered with at least 1 inch of water.
- Bring the water to a gentle boil and process the jars for 10 minutes (adjust for altitude if necessary).
- After processing, carefully remove the jars from the water bath using a jar lifter or tongs and place them on a towel-lined surface.
7. Cool and Store:
- Allow the jars to cool undisturbed for 12 to 24 hours.
- Check the seals by pressing down on the lids; they should not flex or pop.
- Label the jars with the date and store them in a cool, dark place such as a pantry or cellar.
- Canned butter can be stored for up to a year, although for best quality, it is recommended to consume within 6-9 months.
Homemade canned butter offers a convenient and flavorful way to preserve the creamy goodness of this beloved ingredient.
By following the steps outlined in this guide, you can create your own batch of delicious homemade butter and enjoy its smooth texture and rich taste in various recipes. Whether you're spreading it on warm bread, using it in baking, or incorporating it into savory dishes, canned butter providesa long-lasting supply of culinary delight. So, roll up your sleeves, gather your ingredients, and embark on the journey of making and canning your very own homemade butter. Once you experience the satisfaction of preserving creamy goodness, you'll never look back.


Comments
Please indicate what quantity this recipe makes.
ReplyDeleteOh come on! Don't discard the buttermilk! Make pancakes with that liquid wonder, and enjoy them with some fresh butter too! :)
ReplyDeletehow many 1/4 pint jars does this make?
ReplyDelete