
Unlocking the Power of Productivity: 10 Strategies for Achieving More in Less Time
For those who have truly embraced the world of canning, it becomes more than just a hobby—it becomes an addiction.

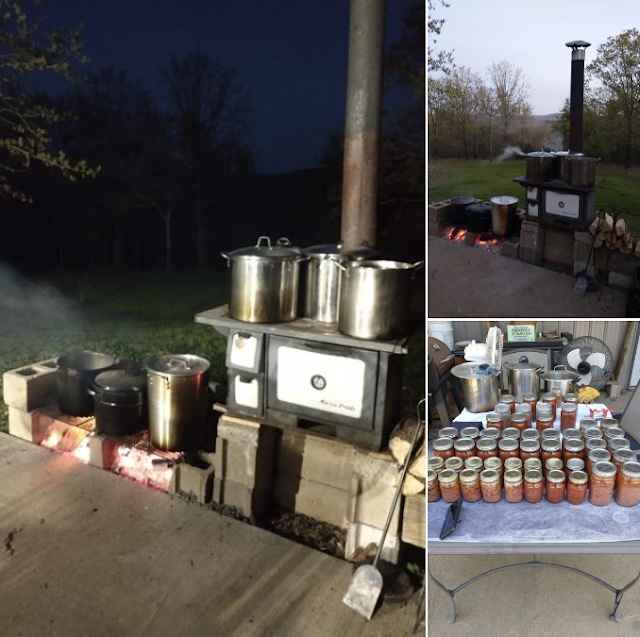
The thrill of waking up at 3am to embark on a canning adventure, supported by a dedicated partner, is a testament to the passion and dedication that canning enthusiasts bring to the table. In this article, we celebrate the achievements of an avid canner who recently canned an impressive array of chili and stew meat. Join us as we delve into the process, share an enticing recipe, and honor the spirit of community that makes the world of canning so remarkable.
A Passion for Canning: From Midnight Adventures to Flavorful Creations
In the realm of canning, there are those who dabble and those who immerse themselves wholeheartedly. Our featured canner falls into the latter category, with a level of dedication and enthusiasm that is truly inspiring. From rising at the crack of dawn to a supportive partner stoking the fires, their recent canning triumph resulted in an impressive bounty of 51 jars, showcasing the versatility and delight of homemade canned chili and stew meat. Let's dive into their canning journey, celebrate their achievements, and share a delectable recipe for all to enjoy.
Recipe: Hearty Canned Chili
Note: The following recipe assumes familiarity with proper water bath canning techniques and safety practices. It is essential to consult reputable canning resources for detailed instructions on canning chili to ensure food safety.
Ingredients:
- - 19 quarts of prepared chili
- - 5 pints of prepared chili
- - Canning jars (quart and pint sizes)
- - Canning lids and bands
- - Water bath canner
- - Jar lifter
- - Clean towels
Instructions:
1. Prepare the chili:
- - Begin by preparing a large batch of your favorite chili recipe. Choose a recipe that suits your taste preferences, whether it's a classic beef chili, a spicy bean chili, or a vegetarian option.
- - Ensure the chili is cooked to perfection, allowing the flavors to meld together harmoniously. Adjust the seasoning to your liking, balancing the heat, spices, and depth of flavors.
2. Fill the jars:
- - Sterilize your canning jars by either using a dishwasher or boiling them in water for 10 minutes. Keep them hot until ready to use.
- - Ladle the prepared chili into the hot jars, leaving the recommended headspace (usually 1 inch) at the top to allow for expansion during the canning process. Ensure that each jar contains a generous portion of chili, evenly distributing the ingredients.
3. Seal the jars:
- - Wipe the jar rims with a clean, damp cloth to remove any food residue or chili splatters.
- - Place the canning lids on the jars and secure them with the bands, tightening just until finger-tight.
4. Process the jars in the water bath canner:
- - Fill the water bath canner with enough water to cover the jars by at least 1 inch.
- - Carefully place the filled jars into the canner, ensuring they are spaced apart and do not touch each other or the sides of the canner.
- - Bring the water to a gentle boil, and once it reaches a rolling boil, start the processing time according to your recipe and altitude. Process for the recommended time, usually around 15 to 20 minutes for quarts and 10 to 15 minutes for pints.
- - Adjust the processing time as needed based on your location and recipe requirements.
5. Cool, label, and store:
- - After the processing time is complete, turn off the heat and allow the canner to sit for 5 minutes.
- - Using a jar lifter, carefully remove the processed jars from the canner and place them on a clean towel to cool.
- - As the jars cool, you may hear the satisfying "pop" sound, indicating a successful seal of the lids.
- - Once completely cooled, label the jars with the contents, date, and any additional relevant information.
- - Store the canned chili in a cool, dark place, away from direct sunlight. Properly sealed and processed jars of canned chili can be safely stored for up to a year.
The passion and dedication of a canning addict are evident in the remarkable achievements showcased in this article.
From early morning canning adventures to an impressive collection of jars filled with homemade chiliand stew meat, the canner's commitment to their craft is truly inspiring. We hope this article has not only celebrated their accomplishments but also provided you with a delicious recipe to try in your own canning endeavors. Remember, the world of canning is not just about preserving food—it's about embracing a community, sharing experiences, and savoring the fruits of your labor. Happy canning, and may your jars be filled with flavors that bring joy to your table!


Comments