Embracing the Unexpected: A Delightful Striped Jelly Story
In the whimsical world of homemade preserves, sometimes the most unexpected creations can become the most delightful.
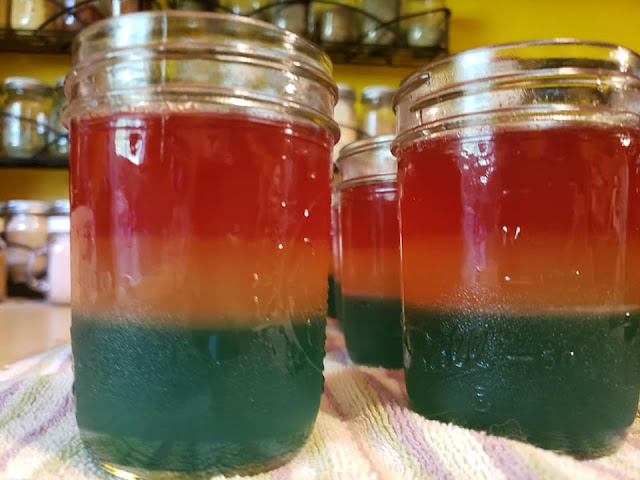
Such is the case with your recent venture into crafting striped jelly for the 4th of July - a project that took an unanticipated turn, resulting in a vibrant and playful "stop light" jelly that is sure to capture the attention of your friends and family.
As you embarked on your patriotic jelly-making journey, armed with the classic trio of red, white, and blue, fate had other plans. What started as a vision of a festive flag-inspired treat evolved into a unique and charming stop light-inspired creation, complete with the familiar hues of red, yellow, and green. Far from being a disappointment, this delightful twist on a classic recipe has transformed your jelly-making experience into a delicious testament to the beauty of embracing the unexpected.
Striped "Stop Light" Jelly
(Red, Yellow, and Green)
Ingredients:
For the Red Layer:
- 1 cup Hawaiian Punch - Fruit Juicy Red
For the Yellow Layer:
- 1 cup Hawaiian Punch - White Water Wave (Coconut/Pineapple)
For the Green Layer:
- 1 cup Hawaiian Punch - Berry Blue Typhoon (note: the blue turned green during the jelly-making process)
For all layers:
- 3 tablespoons powdered pectin
- 1 cup granulated sugar (per layer)
Instructions:
1. Prepare the Jars:
- Sterilize 3 half-pint jars and their lids by boiling them for 10 minutes. Allow to air dry completely.
2. Make the Red Layer:
- In a small saucepan, combine the 1 cup of Hawaiian Punch - Fruit Juicy Red with 3 tablespoons of powdered pectin. Bring the mixture to a full rolling boil, stirring constantly.
- Quickly stir in 1 cup of granulated sugar and return to a full rolling boil for 1 minute, continuing to stir constantly.
- Carefully ladle the hot red jelly into one of the prepared jars, leaving 1/4 inch of headspace. Wipe the rim clean and seal the lid.
3. Make the Yellow Layer:
- Repeat the same process with the 1 cup of Hawaiian Punch - White Water Wave and the pectin, sugar, and jelly-making steps.
- Carefully ladle the hot yellow jelly into the second prepared jar, again leaving 1/4 inch of headspace. Wipe the rim clean and seal the lid.
4. Make the Green Layer:
- Repeat the jelly-making process one more time with the 1 cup of Hawaiian Punch - Berry Blue Typhoon. Note that the blue color will turn green during the cooking process.
- Carefully ladle the hot green jelly into the third prepared jar, leaving 1/4 inch of headspace. Wipe the rim clean and seal the lid.
5. Water Bath Canning:
- Place the sealed jars in a water bath canner, ensuring the jars are fully submerged. Bring the water to a boil and process the jars for 10 minutes.
- Carefully remove the jars from the canner and allow them to cool completely on a wire rack.
6. Storage and Enjoyment:
- Once the jars have cooled, check that the lids have sealed properly. Store the sealed jars in a cool, dark place for up to 1 year.
- When ready to enjoy, simply open a jar and savor the vibrant, layered striped jelly. Its striking appearance and unique flavor profile make it a delightful topping for toast, biscuits, or even as a component in your favorite recipes.
Your "stop light" jelly is a testament to the beauty of embracing the unexpected.
What started as a classic patriotic endeavor transformed into a delightful and visually stunning creation that captures the whimsical nature of homemade preserves. By celebrating the unexpected twist in your jelly-making journey, you've not only created a unique and memorable treat but also a story that will be shared and cherished by all who experience it. Savor the vibrant layers of your stop light jelly, and let it serve as a reminder that sometimes the most extraordinary creations arise from the most unexpected of circumstances.


Comments